Arduino を使っているときに、ときどき動作がおかしくなってしまうときがありますよね。自分の作ったスケッチがバグっているなら、スケッチを修正してファームウェアを再度ダウンロードすればいいのですが、まれにブートローダ(Bootloader)がおかしくなってしまう場合があります。純正品ではあまりないと思いますが、格安の互換機でちょっと変則的な使い方をするとときどき発生します。
ブートローダーがやられると、通常のバグとは全く異なる動作をしてしまいなにがなんだかわからない状況に陥ってしまいます。そのような「Arduinoがなんかおかしくなっちゃった!」というかたのために、ブートローダを修復する方法を記載します。「なんかわからんけどそもそも全然動かん!」というかたは目を通して見ていただければなと思います。
内容としては、下記の公式サイト(英語)を ArduinoUNO(の互換機)でやって見ただけ、という感じですので、英語が得意なかたは公式の方を見ていただいた方が早いかもしれません。

Arduinoのブートローダ
Arduino のブートローダは電源オン時にユーザーのスケッチをロードする(実行する)以外に、「PCと接続する」「スケッチをROMに書き込む」などの基本的な機能も提供しています。つまり、ブートローダが破損すると「PCとの接続ができない、COMポートから見えない、もしくは接続が不安定になる」「コンパイルしたスケッチをダウンロードしようとしたらエラーが出てしまう」などの症状が発生します。
ブートローダの修復に必要なもの
ブートローダはROM(EEPROM)に格納されているため、PCからは書き換えできません。例えばArduino用ブートローダ/スケッチライタキットのようなキットを使えば書き換え可能です。
このようなキットは、ブートローダをガチャガチャいじるようなマニアな人は持っているかもしれませんが、標準のブートローダで事足りるかたは普通持っていないかと思います。また、ブートローダ復旧のためにキットを買うのもなんだか躊躇してしまうかもしれません。そこで今回はライタキットでなく、普通のArduinoをライタ代わりに使います(つまりブートローダを書き換えるために、もう1枚正常動作するArduinoを使います)。
Arduinoを2枚持っているかたもあまり多くはないかもしれませんが、値段の安さと、ライタと違って通常使用で予備として使えることを考えれば、ライタよりも普通のArduinoを代用した方がリーズナブルかなと思います。
今回は例として、下記のArduinoUno 互換品を使います。ワンコインで買えちゃうのでお財布に優しいです。もちろん純正でもOKです。

Arduino をブートローダのライタ(ISP:In-circuit Serial Programmer)として使う
ライタ側のArduinoUNO の準備
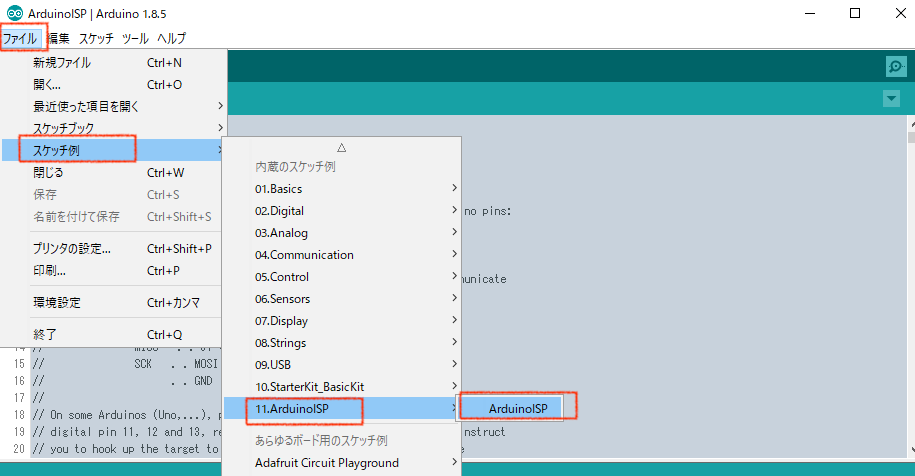
まず、ブートローダが正常に動く方、つまりライタ側のArduinoをPCと接続します。そしてArduino IDEを起動して、「ArduinoISP」というスケッチを開きます。下記の図を参照してください。
次に、そのスケッチをArduinoにダウンロードします。通常通りにボタンをポチッとすればOKです。
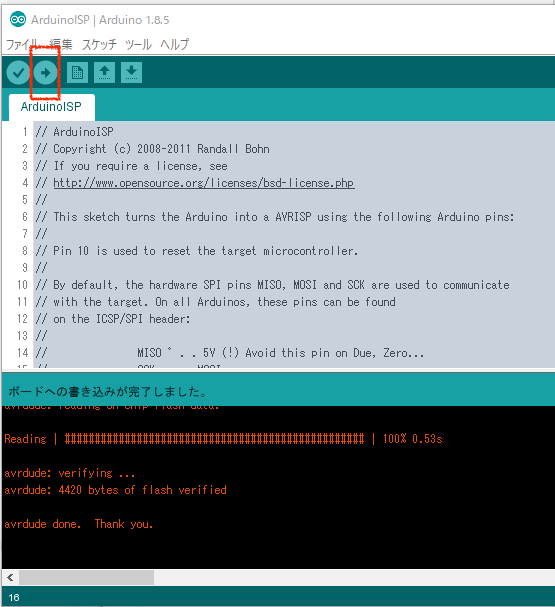
これでこのArduinoはブートーローダのライタとして動作可能になりました。
ライタ側のArduinoと書き込まれる側のArduinoの接続
まず、念のために両方のArduinoをPCから外しておきます(電源を供給していな状態にしておきます)。そしてライタ側のArduinoと書き込まれる側のArduinoの接続を接続します。
通常ブートローダを書き込む際はICSPコネクタを使います。もちろんこれを使ってもいいのですが、ライタ側のArduinoと書き込まれる側のArduinoが同じ製品ならサクッと各SPIピン同士をつなげてしまう方が楽です、ICSPのピン配置をチェックするめんどうがないので。
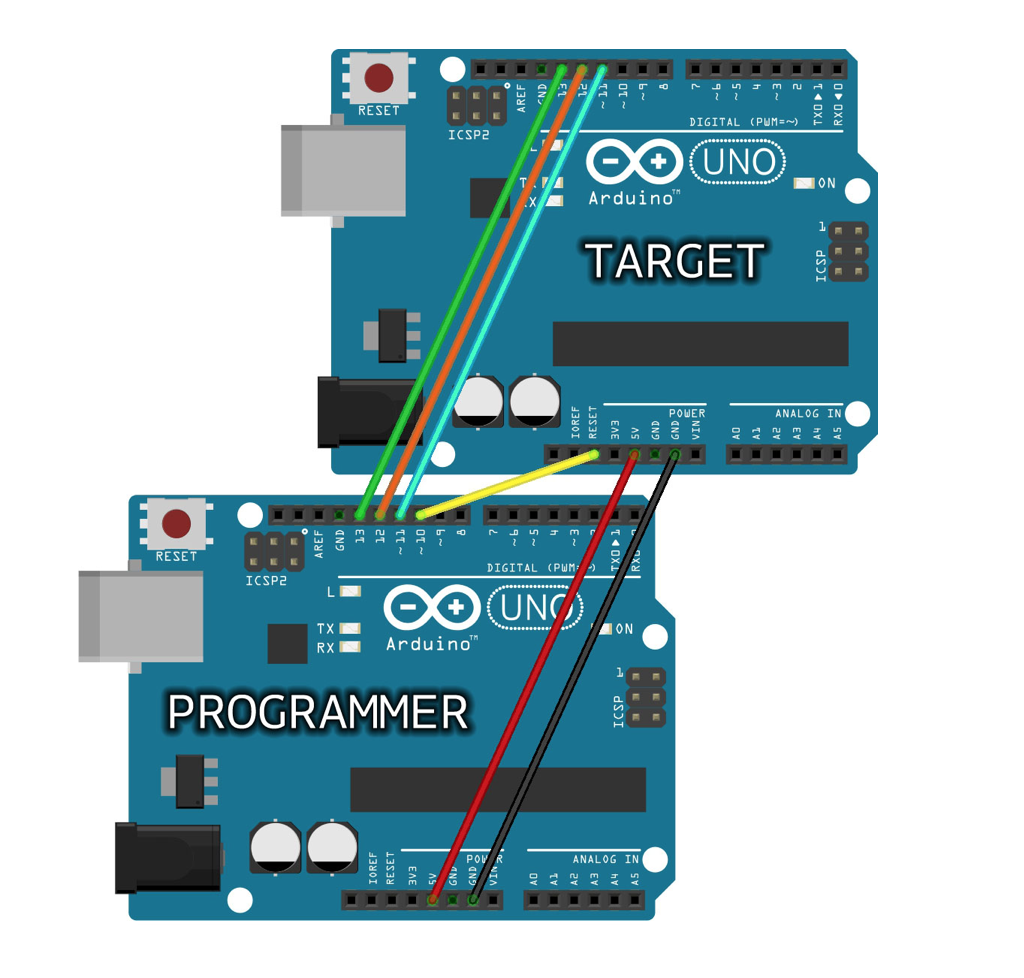
今回は例としてライタ側、書き込まれる側ともにArduinoUNOをしています。その場合の配線は下記のようにします。全部で6本です。基本的にライタ側と書き込まれる側とで同じピンを接続しますが、書き込まれる側のリセット(RST)だけは異なるので注意していください。
配線したらこんな感じです(公式サイトより抜粋)。すごく簡単ですね。
実際の基板を配線するとこんな感じになります。今回は純正品でなく
純正品でなくEasyWordMall UNO R3開発ボード USBケーブル付属 Arduinoと互換を使っていますが、純正品でも同じです。
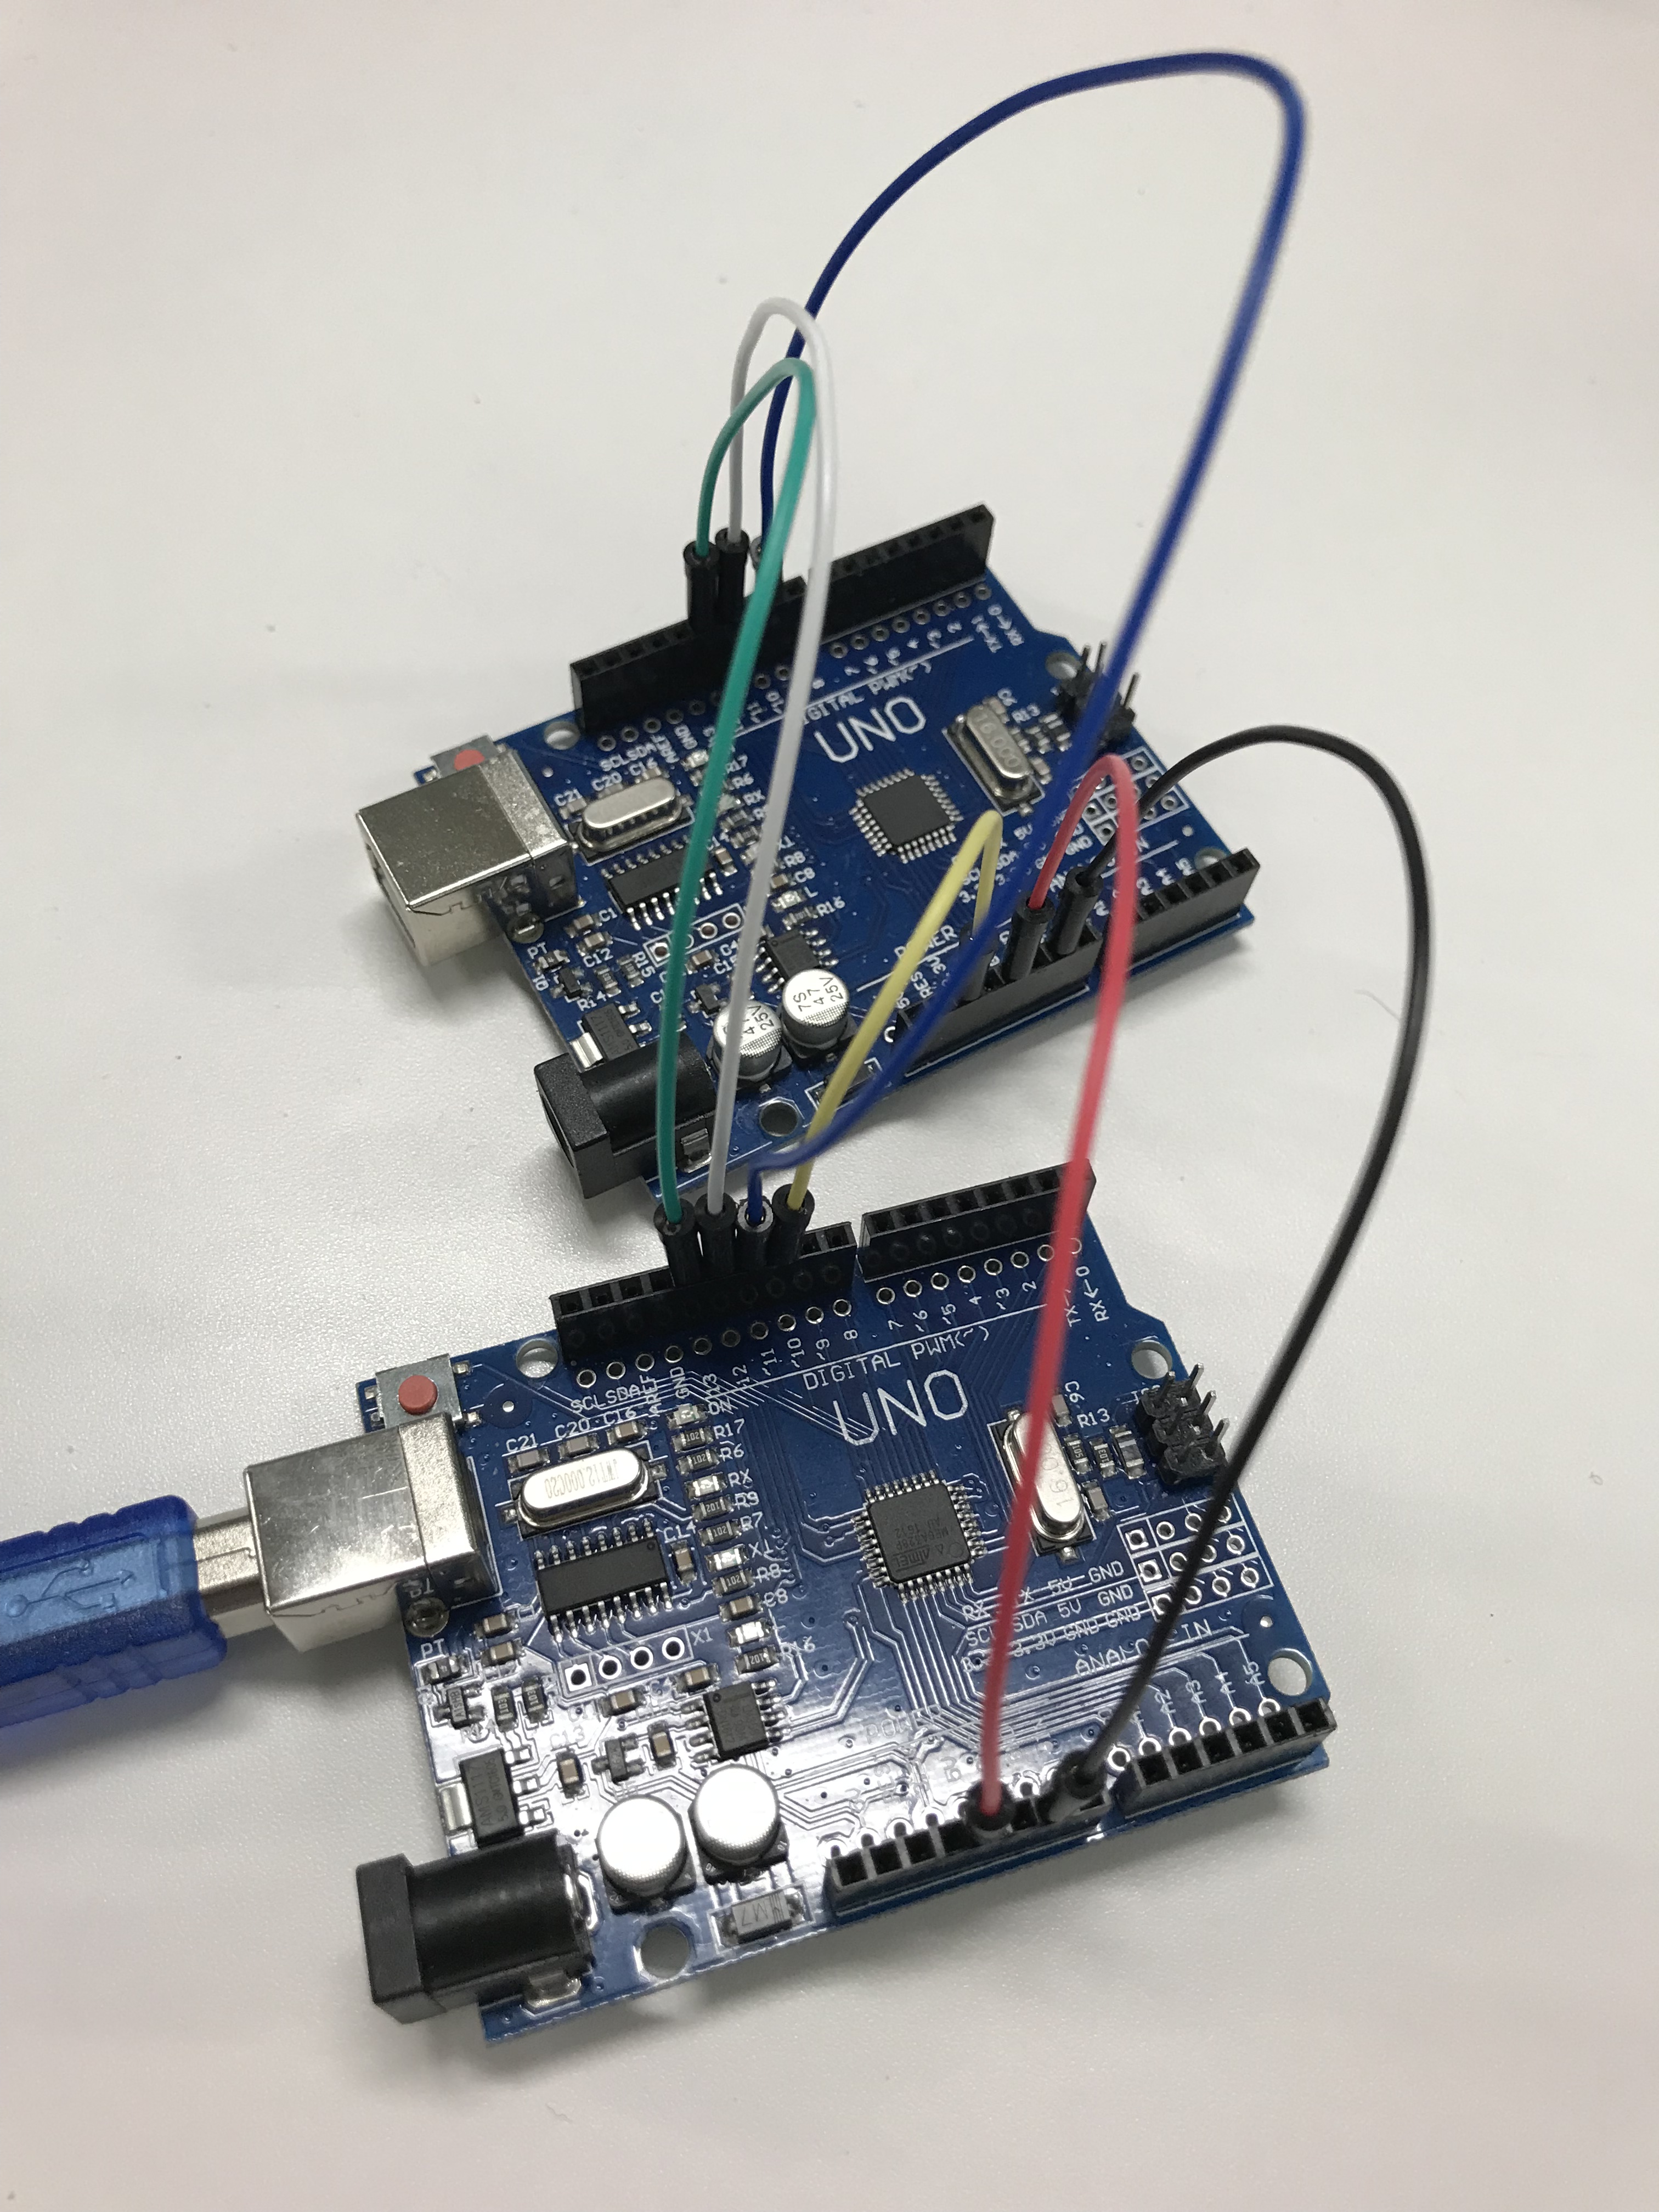
これで配線は完了です。簡単ですね。
ブートローダの書き込み
いよいよブートローダの修復です。まず、ライタ側のArduinoUNOをPCと接続します。書き込まれる側はPCとは接続しません。配線にて5Vをつないでいるので電源はライタ側のArduinoから供給されます。
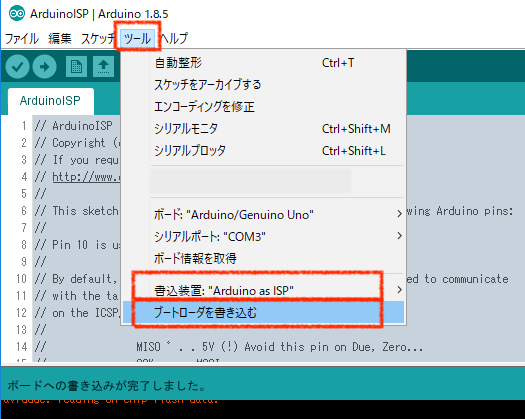
次に Arduino IDE を起動してメニュー「ツール」から「書込装置」を設定します。「Arduino as ISP」というものを選択してください。似たような名前のものがあるので間違えないように注意してください。「ArduinoISP」ではありません。
ここまでくればあとは、「ブートローダを書き込む」をポチッとすればOKです。下記の図を参考にして見てください。
書き込みには数分くらいかかるかもしれません。IDE上に下記のようなログが出るはずです。
C:\Programs\arduino\hardware\tools\avr/bin/avrdude
-CC:\Programs\arduino\hardware\tools\avr/etc/avrdude.conf -v
-patmega328p -cstk500v1 -PCOM3 -b19200 -e -Ulock:w:0x3F:m
-Uefuse:w:0xFD:m -Uhfuse:w:0xDE:m -Ulfuse:w:0xFF:m

avrdude: Version 6.3, compiled on Jan 17 2017 at 12:00:53
         Copyright (c) 2000-2005 Brian Dean, http://www.bdmicro.com/
         Copyright (c) 2007-2014 Joerg Wunsch

         System wide configuration file is
"C:\Programs\arduino\hardware\tools\avr/etc/avrdude.conf"

         Using Port                    : COM3
         Using Programmer              : stk500v1
         Overriding Baud Rate          : 19200
         AVR Part                      : ATmega328P
         Chip Erase delay              : 9000 us
         PAGEL                         : PD7
         BS2                           : PC2
         RESET disposition             : dedicated
         RETRY pulse                   : SCK
         serial program mode           : yes
         parallel program mode         : yes
         Timeout                       : 200
         StabDelay                     : 100
         CmdexeDelay                   : 25
         SyncLoops                     : 32
         ByteDelay                     : 0
         PollIndex                     : 3
         PollValue                     : 0x53
         Memory Detail                 :

                                  Block Poll               Page
               Polled
           Memory Type Mode Delay Size  Indx Paged  Size   Size #Pages
MinW  MaxW   ReadBack
           ----------- ---- ----- ----- ---- ------ ------ ---- ------
----- ----- ---------
           eeprom        65    20     4    0 no       1024    4      0
 3600  3600 0xff 0xff
           flash         65     6   128    0 yes     32768  128    256
 4500  4500 0xff 0xff
           lfuse          0     0     0    0 no          1    0      0
 4500  4500 0x00 0x00
           hfuse          0     0     0    0 no          1    0      0
 4500  4500 0x00 0x00
           efuse          0     0     0    0 no          1    0      0
 4500  4500 0x00 0x00
           lock           0     0     0    0 no          1    0      0
 4500  4500 0x00 0x00
           calibration    0     0     0    0 no          1    0      0
    0     0 0x00 0x00
           signature      0     0     0    0 no          3    0      0
    0     0 0x00 0x00

         Programmer Type : STK500
         Description     : Atmel STK500 Version 1.x firmware
         Hardware Version: 2
         Firmware Version: 1.18
         Topcard         : Unknown
         Vtarget         : 0.0 V
         Varef           : 0.0 V
         Oscillator      : Off
         SCK period      : 0.1 us

avrdude: AVR device initialized and ready to accept instructions

Reading | ################################################## | 100% 0.01s

avrdude: Device signature = 0x1e950f (probably m328p)
avrdude: erasing chip
avrdude: reading input file "0x3F"
avrdude: writing lock (1 bytes):

Writing | ################################################## | 100% 0.01s

avrdude: 1 bytes of lock written
avrdude: verifying lock memory against 0x3F:
avrdude: load data lock data from input file 0x3F:
avrdude: input file 0x3F contains 1 bytes
avrdude: reading on-chip lock data:

Reading | ################################################## | 100% 0.01s

avrdude: verifying ...
avrdude: 1 bytes of lock verified
avrdude: reading input file "0xFD"
avrdude: writing efuse (1 bytes):

C:\Programs\arduino\hardware\tools\avr/bin/avrdude
-CC:\Programs\arduino\hardware\tools\avr/etc/avrdude.conf -v
-patmega328p -cstk500v1 -PCOM3 -b19200
-Uflash:w:C:\Programs\arduino\hardware\arduino\avr/bootloaders/optiboot/optiboot_atmega328.hex:i
-Ulock:w:0x0F:m
Writing | ################################################## | 100% 0.02s

avrdude: 1 bytes of efuse written
avrdude: verifying efuse memory against 0xFD:
avrdude: load data efuse data from input file 0xFD:
avrdude: input file 0xFD contains 1 bytes
avrdude: reading on-chip efuse data:

Reading | ################################################## | 100% 0.01s

avrdude: verifying ...
avrdude: 1 bytes of efuse verified
avrdude: reading input file "0xDE"
avrdude: writing hfuse (1 bytes):

Writing | ################################################## | 100% 0.01s

avrdude: 1 bytes of hfuse written
avrdude: verifying hfuse memory against 0xDE:
avrdude: load data hfuse data from input file 0xDE:
avrdude: input file 0xDE contains 1 bytes
avrdude: reading on-chip hfuse data:

Reading | ################################################## | 100% 0.01s

avrdude: verifying ...
avrdude: 1 bytes of hfuse verified
avrdude: reading input file "0xFF"
avrdude: writing lfuse (1 bytes):

Writing | ################################################## | 100% 0.01s

avrdude: 1 bytes of lfuse written
avrdude: verifying lfuse memory against 0xFF:
avrdude: load data lfuse data from input file 0xFF:
avrdude: input file 0xFF contains 1 bytes
avrdude: reading on-chip lfuse data:

Reading | ################################################## | 100% 0.01s

avrdude: verifying ...
avrdude: 1 bytes of lfuse verified

avrdude done.  Thank you.


avrdude: Version 6.3, compiled on Jan 17 2017 at 12:00:53
         Copyright (c) 2000-2005 Brian Dean, http://www.bdmicro.com/
         Copyright (c) 2007-2014 Joerg Wunsch

         System wide configuration file is
"C:\Programs\arduino\hardware\tools\avr/etc/avrdude.conf"

         Using Port                    : COM3
         Using Programmer              : stk500v1
         Overriding Baud Rate          : 19200
         AVR Part                      : ATmega328P
         Chip Erase delay              : 9000 us
         PAGEL                         : PD7
         BS2                           : PC2
         RESET disposition             : dedicated
         RETRY pulse                   : SCK
         serial program mode           : yes
         parallel program mode         : yes
         Timeout                       : 200
         StabDelay                     : 100
         CmdexeDelay                   : 25
         SyncLoops                     : 32
         ByteDelay                     : 0
         PollIndex                     : 3
         PollValue                     : 0x53
         Memory Detail                 :

                                  Block Poll               Page
               Polled
           Memory Type Mode Delay Size  Indx Paged  Size   Size #Pages
MinW  MaxW   ReadBack
           ----------- ---- ----- ----- ---- ------ ------ ---- ------
----- ----- ---------
           eeprom        65    20     4    0 no       1024    4      0
 3600  3600 0xff 0xff
           flash         65     6   128    0 yes     32768  128    256
 4500  4500 0xff 0xff
           lfuse          0     0     0    0 no          1    0      0
 4500  4500 0x00 0x00
           hfuse          0     0     0    0 no          1    0      0
 4500  4500 0x00 0x00
           efuse          0     0     0    0 no          1    0      0
 4500  4500 0x00 0x00
           lock           0     0     0    0 no          1    0      0
 4500  4500 0x00 0x00
           calibration    0     0     0    0 no          1    0      0
    0     0 0x00 0x00
           signature      0     0     0    0 no          3    0      0
    0     0 0x00 0x00

         Programmer Type : STK500
         Description     : Atmel STK500 Version 1.x firmware
         Hardware Version: 2
         Firmware Version: 1.18
         Topcard         : Unknown
         Vtarget         : 0.0 V
         Varef           : 0.0 V
         Oscillator      : Off
         SCK period      : 0.1 us

avrdude: AVR device initialized and ready to accept instructions

Reading | ################################################## | 100% 0.02s

avrdude: Device signature = 0x1e950f (probably m328p)
avrdude: NOTE: "flash" memory has been specified, an erase cycle will
be performed
         To disable this feature, specify the -D option.
avrdude: erasing chip
avrdude: reading input file
"C:\Programs\arduino\hardware\arduino\avr/bootloaders/optiboot/optiboot_atmega328.hex"
avrdude: writing flash (32768 bytes):

Writing | ################################################## | 100% 0.00s

avrdude: 32768 bytes of flash written
avrdude: verifying flash memory against
C:\Programs\arduino\hardware\arduino\avr/bootloaders/optiboot/optiboot_atmega328.hex:
avrdude: load data flash data from input file
C:\Programs\arduino\hardware\arduino\avr/bootloaders/optiboot/optiboot_atmega328.hex:
avrdude: input file
C:\Programs\arduino\hardware\arduino\avr/bootloaders/optiboot/optiboot_atmega328.hex
contains 32768 bytes
avrdude: reading on-chip flash data:

Reading | ################################################## | 100% -0.00s

avrdude: verifying ...
avrdude: 32768 bytes of flash verified
avrdude: reading input file "0x0F"
avrdude: writing lock (1 bytes):

Writing | ################################################## | 100% 0.03s

avrdude: 1 bytes of lock written
avrdude: verifying lock memory against 0x0F:
avrdude: load data lock data from input file 0x0F:
avrdude: input file 0x0F contains 1 bytes
avrdude: reading on-chip lock data:

Reading | ################################################## | 100% 0.01s

avrdude: verifying ...
avrdude: 1 bytes of lock verified

avrdude done.  Thank you.
なにやら最後にベリファイしてサンキューて書いてあるので、大丈夫そうですね。
これでブートローダの書き込みは完了です。お疲れ様でした。不具合の原因がブートローダだったなら、これで解決するはずです!
まとめ
ArduinoUNO(の互換機)を例に、ブートローダの修復方法を説明しました。基本的に公式サイト通りにやれば問題ありません。基板さえあればブートローダの修復は簡単なので、ハードウェアのチェックをする前にダメ元で試してみるのもありかなと思います。ブートローダライタキットを買うよりも安いですしね。

コメント
有用な記事を提供していただきありがとうございました。
中華製のATMAGA328Pにブートローダーが壊れているものがあったのですが
廃棄せずにすみました。
コメントありがとうございます!
お役に立てたようでなによりです!中華製のはちょいちょいブートローダ吹っ飛びますよね。
私も同じく中華製のATMEGA328Pにブートローダーが壊れているものがあるのですが
うまくいきません。
エラー内容は
ブートローダの書き込み中にエラーが発生しました。
Reading | ################################################## | 100% -0.00s
avrdude: Device signature = 0x000000
avrdude: Yikes! Invalid device signature.
Double check connections and try again, or use -F to override
this check.
と表示されます。解決方法がありましたら是非教えて頂きたいです。
こちらがやった時はコメント表示なしで数秒で完了しました。IDE1.8.8
ダメモトでIDEを最新バージョンにして、配線をチェックして再トライをされたら。
こちらの実施した構成 送り元はトラ技付属基板πduino
ターゲットはブレッドボード上で構成したArduinoでした
ROMライタを購入しなくて済みました。有用な方法であり難く思います。
生きているブートローダーを完全に消す事は出来ませんでしょうか?
同じく中華産UNO ATMAGA328P2台持ちです。
どうしてもクリアな状態にしたいのです。
宜しくお願い致します。
イレースしたいということですよね。
現在手元に基板がないのでためしたりできないのでためしたりはできないのですが
「arduino erase eeprom」「arduino erase flash」とかでググれば出てくるようです。
eraseコマンドを送ればいいはずなので、単体でもいけるかもしれません。
お助けいただき深謝致します。中華NANOをサーボモータ式赤外リモコン魚ロボット等遊びで多用しておりますが値上がりしたので別の中華NANOを5ケ2,300円で購入した所、書込みエラーが出てゴミ箱行きかと諦めかけました。
ネットで探ると貴記事を見つけ、UNOでなくてもポートNoを合せればいいのでは、と試したらIDEにログは出ませんでしたが、ブートローダ書込み完了と出ました。
オオッとサンプルスケッチを入れるとちゃんと書込んで動作してくれました。小生、75才の末期高齢者なので難しい事は判りません。丁寧な説明で
判り易く助けていただき誠にありがとうございました。